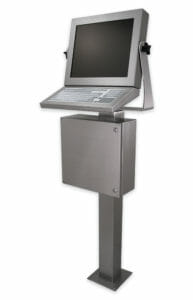
 The Hope Industrial Workstation System allows for thousands of combinations of touch screens, monitors, keyboards, mounts, and enclosures to create the ideal computer-based HMI for any application in a factory environment.
You can design your own workstation using any of these options using our 3D Configuration and Quoting Tool.
With so many options, the easiest way to configure your perfect solution is to contact our highly trained sales team who can discuss your environment and suggest options and alternatives.
Universal Mount Monitor options and accessories can be assembled in the field, or fully assembled and tested at our factory for a charge of $210.
The following guide outlines the steps to create your own configuration.
Selecting Workstation Components
Hope Industrial Workstations consist of a display, a cable exit, cables, a monitor mount, and any necessary options (industrial keyboards, PC enclosures, KVM extenders, etc).
To complete a monitor configuration, select from each of the following sections. Item numbers and pricing can be found in the "Ordering Info" section of each linked product page.
Step 1: Select a Monitor or Touch Screen
Select the base monitor or touch screen from any of our Universal Mount Monitors. Options include size, material, NEMA/IP rating, and window options.
Step 2: Select a Cable Exit Plate
All monitors require a Cable Exit Plate to seal the rear cable cavity. Options include conduit, compression glands, or blank plates with pre-drilled pilot holes for use with customer-provided cable exit glands.
For conduit, full assemblies are available containing all necessary cables, conduit, and fittings pre-assembled and ready to install. These conduit cable assemblies are available with USB or CAT5 (for KVM extender) data cables. When one of these options is chosen, you must also choose the correct regional power plug; no other cable selections are required.
Step 3: Select Cables
All monitors require power and video cables (analog or digital).
Touch screens also require a touch cable (USB Type A-M to B-M, or Serial). Monitor-Mounted Keyboards require a USB extension cable, Type A-M to Type A-F.
When a conduit assembly is chosen, only a regional power plug must be selected; all other cables are included in the assembly.
Step 4: Choose a Mounting Option
Universal Mount Monitors have side yoke mount points and a rear 100mm VESA mount pattern. Mounting options include pedestals, articulating wall arms, mounting yokes, and light industrial VESA options.
Step 5: Select a Keyboard, Enclosure, and Other Options
Keyboard options are available for mounting directly to the display, to a wall, or for placement on a desk or benchtop. Industrial Enclosures for Thin Clients and PCs allow a non-IP-rated PC to be placed directly at the operator station and can be fixed to a pedestal base or directly to a wall. Monitor-Mounted KVM Extenders allow the workstation to be placed up to 300 m (1,000') away from the computer. Screen Protectors can provide additional touch screen protection in tough, dry environments (but should not be used in wet environments).